Virtual Clamping (VC)
Virtual Clamping replaces measuring fixtures
As a company, we have been counting on this forward-looking process since the market launch of Virtual Clamping.
We offer you the whole process as a service. From the generation of the deformation model and programming to evaluation and result export, you get everything from a single source.
The Virtual Clamping process consists of a universal hardware and software solution and efficiently supports quality checks throughout the entire component manufacture process. The multiple design and manufacture of measuring fixtures for individual process steps of the various components is no longer necessary.
During the production of sheet metal or plastic parts, deviations from the nominal specification (warpage / bounce) occur due to common forming processes. To compensate for these deviations during measurement and to simulate the mounting situation, components previously had to be clamped in complex measuring fixtures. With the new ZEISS Virtual Clamping process, this measuring process can be greatly simplified and the costs for component-specific measuring fixtures reduced. For this purpose, a universal pneumatic holding device is combined with innovative algorithms in the ZEISS software.
The result of Virtual Clamping is exactly the same as the measurement in an expensive physical fixture, but with much less operator influence and higher repeatability. Virtual Clamping efficiently supports measurements throughout the part creation process.
Virtual Clamping
90% measurement - 10% simulation
The start point of Virtual Clamping is a high-resolution surface measurement. Only the differential “bending” is simulated, not the entire forming process.
Idea of Virtual Clamping - VC replaces measuring fixtures
The existing component distortion is compensated by numerical simulation. Physical clamping devices can be dispensed with.
How Virtual Clamping and Weight Compensation Work
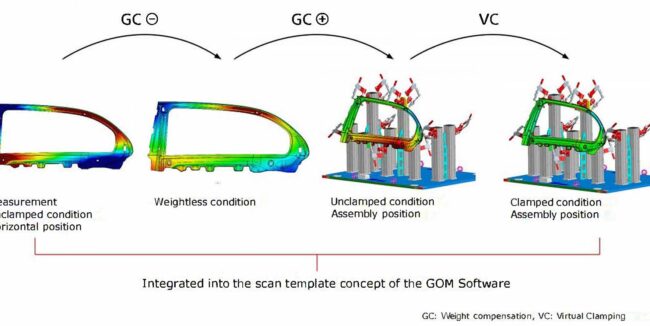
With the aid of a universal pneumatic holder, the component is temporarily levitated at the bearing points. Thus, the pneumatic system ensures a tension-free pickup. The component is then digitized with high precision using the ATOS scanner, which also determines the positions of the support points. The entire surface is freely accessible for measurement, as no clamping elements block the view.
Virtual Clamping takes place in two stages within the ZEISS software. First, an innovative algorithm compensates for gravity-induced deflection and replicates the intended mounting position of the component. The component is then virtually clamped at the specified positions using the ZEISS software. The surface deviation between measurement and CAD model is visualized as a color plot.
Advantages Virtual Clamping
The focus is on the qualification of the component, not the measuring fixture!
A major advantage of Virtual Clamping is the high process capability as well as a significant cost reduction:
High process capability
- perfect accessibility for optical measurements
- mathematically perfect boundary conditions
- No undefined friction at the tensioners
- reduced operator influence
Cost reduction
- No need for individual measuring fixtures
- fewer multiple measurements (e.g. different clamping plans)
- Simple change management (e.g. without mechanical changes)
- early start in the process chain
- fewer optimization loops
Disadvantages of conventional clamping
The following influencing factors are disadvantageous in conventional clamping:
- high costs for design, manufacturing, calibration and storage
- High time expenditure for iterative readjustment of clamping points
- time-consuming change management: change of clamping points, CAD versions
- limited reproducibility
- Operator influence, clamping sequence, position deviation of the support & clamping points
- limited accessibility
- Covering of measuring points and surfaces
- Measurement next to actual clamping points
Deformation model / FEM model
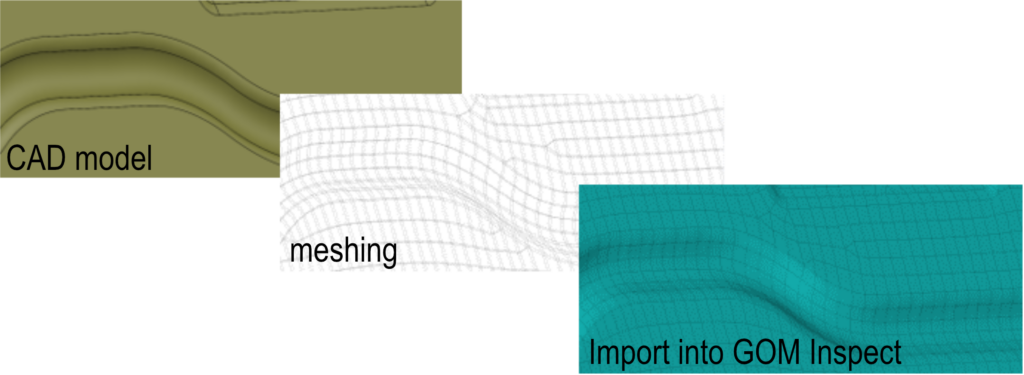
The required FEM model can be ordered from PROTOS-3D and imported into the ZEISS software as a deformation model.
The component stiffness is represented by the deformation model. Based on this model, the numerical simulation of the virtual clamping is executed within the ZEISS Quality Suite and then transferred to the acquired mesh data.

Our experience with Virtual Clamping enables us to ideally combine the metrological requirements with the aspects of simulation. For this purpose, the FEM model can be adapted to their individual requirements.
Supported range of components
The supported part spectrum for Virtual Clamping includes the following parts / part properties:
- homogeneous materials
- homogeneous material properties
- elastic deformation behavior
- Single parts
- ZSB components (available with ZEISS Quality Suite 2022 and higher)
- in the elastic deformation range
- small to medium sized components
- up to approx. 2 meters
Questions?
We analyse.
You profit.
How can we support you? Contact us and we will get back to you as soon as possible.
Sorry, no posts matched your criteria.


